White Cheddar Potato Garlic Soup

Potato Soup2 The Curvy Carrot


Happy mid-March!

I cannot even begin to express how ready I am for summer (or at least a bit of warm weather.)  Milwaukee has been hit pretty hard this year, but, surprisingly, my friends and family back home in Indiana have had it even worse.  I’m tired of astronomical heating bills and my patio furniture constantly toppling over on my balcony.  I’m ready for my daily walk with Scout down to the lake, boats going by on the river, and generous glasses of wine out on my balcony with a book in hand. It’s slowly getting warmer, and the sun is a bit more visible these days, so I know it’s coming.  The other night I even wore a trench coat out instead of my big winter sleeping bag of a coat (which, I have to admit I like putting on when I’m wearing my pajamas still at 4pm on a Sunday and realize no one will notice with the coat on). And, there were some birds actually singing the other morning when I took Scout for a walk.  It’s on its way.  So bring it.

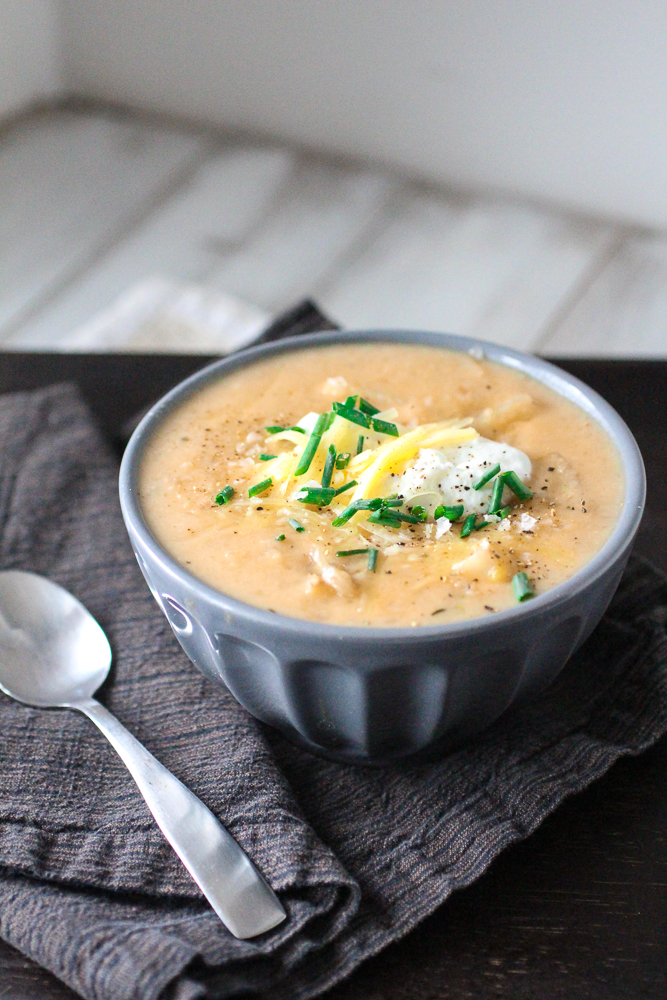
Although…….there are still grey and chilly nights when I need something quick and easy to make my belly full.  Especially weeknights when the days seem to blend together.  Something hearty and filling and salty and creamy. Like this potato soup.

I added in some cheese here to this soup (and added some on top-I have no regrets.) to make it a bit more flavorful, but you can omit if you are watching calories.   (The soup is still incredible without it-but with the heavy cream, it’s not exactly “light” either.  Go big or go home.)  It’s very easy to reheat (it doesn’t separate out like some soups do) and tastes even better the next day.  Feel free to add in other ingredients here-it has a chowder type of consistency that would work well with things like corn or even some greens.


 Potato Soup1 The Curvy Carrot


White Cheddar Potato Garlic Soup

Servings: 6-8


Ingredients

3 tablespoons unsalted butter

1leek, white and light green parts halved lengthwise, washed, and chopped (about 1 cup)

3 medium cloves garlic, minced

2 heads garlic, rinsed, papery skins removed and top third of heads cut off and discarded

6 cups vegetable broth

2 bay leaves

3/4 teaspoon salt

1  and 1/2 pounds russet potatoes, peeled and cut into 1/2-inch cubes (about 4 1/2 cups)

1 pound red potatoes (unpeeled), cut into 1/2-inch cubes (about 3 cups)

1/2 cup heavy cream

1 and 1/2 teaspoons minced fresh thyme leaves

Salt and pepper, to taste

1 cup white cheddar cheese, shredded

For garnish:  chives, additional cheese, Greek yogurt/sour cream, etc


Instructions

1. Melt the butter in a Dutch oven or large pot over medium heat.

2. Add the leeks and cook until soft, 5 minutes.

3. Add the minced garlic and cook until fragrant, about 1 minute.

4. Add the garlic heads, vegetable broth, bay leaves, and 3/4 teaspoon salt; partially cover the pot and bring the soup to a simmer over medium-high heat.

5. Reduce the heat and simmer until the garlic is very tender when pierced with tip of knife, 30 to 40 minutes.

6. Add both types of potatoes and continue to simmer, partially covered, until the potatoes are tender, 15 to 20 minutes.

7. Carefully discard the bay leaves.

8. Remove the garlic heads, and using tongs, squeeze the garlic heads at root ends until cloves slip out of their skins.

9. In a small bowl, mash the garlic to a smooth paste.

10. Stir the cream, thyme, and half of the mashed garlic into the soup; heat soup until hot, about 2 minutes.  (Add more of the mashed garlic if you think it needs more-I was ok with just using half.)

11. Using an immersion blender, process the soup until creamy, with some potato chunks remaining (or, puree the soup in a blender in batches).

12. Slowly stir in the cheese, mixing until the cheese is completely melted.

13.  Season to taste with salt and pepper, and garnish as desired.


Source:  Adapted slightly from Cook’s Illustrated.

March 11, 2014 - 2:08 pm

Katrina @ WVS - I love the idea of a garlic soup – especially with lots of potatoes and cheddar jammed in there! Yum!

March 12, 2014 - 8:02 am

Joanne - It’s officially starting to feel like spring here in the northeast, but that doesn’t mean I’m not craving big bowls of soup! Love how cheesy and comfort-full this is.

March 13, 2014 - 4:07 pm

Melanie @ Carmel Moments - Looks like a mighty good bowl of soup!

Butternut Squash Kale Lasagna

Lasagna 2 The Curvy Carrot


Hearty. Filling.  Cheesy.  Satisfying.

I’m describing this lasagna.

It’s a good one.  A keeper of a recipe, in fact.

There’s lots of different types of lasagnas out there.  Spinach, mushroom, veggie.  But I liked adapting this recipe because I hadn’t really tried a squash variant yet (which I know is pretty common.)  So here’s what I did:  I added in some onion and some extra mozzarella (really, I know this is supposed to be a “light” recipe, but I cannot eat lasagna without a few pieces of glorious melted mozzarella on top.)  And I loved the idea of a cheesy béchamel sauce instead of a tomato-based sauce (again…maybe not so much in the way of being “light”, but it was heavenly.)  I made a giant pan of this and then promptly froze half of it for random weeknights when I don’t feel like cooking (which might be tonight.)  It reheats nicely as leftovers, too, which is always a positive thing.

Add in extra vegetables here if you want.   Some shredded carrots or mushrooms would be great.  And play around with the cheese as well.  I know Gruyere isn’t the cheapest option out there, but I splurged and it was worth it. (Well, really, any cheese is worth it to me, so there you go.)  Enjoy.


Lasagna 3 The Curvy Carrot


Butternut Squash Kale Lasagna

Servings:  6-8


Ingredients

2 tablespoons extra-virgin olive oil, divided

1 medium yellow onion, chopped

One 1 to 1.5 pound butternut squash, roasted and cooled, peeled, and cut into cubes

One head kale (doesn’t matter which type), leaves torn and stems discarded

1/2 teaspoon oregano

Pinch red pepper flakes

1 and 1/2 tablespoons minced garlic, plus an additional 1 teaspoon

1/4 cup all-purpose flour

2 and 3/4 cups milk, divided (I used skim.)

2 ounces Gruyère cheese, shredded and divided

1 ounce Parmigiano-Reggiano cheese, grated

1/2 teaspoon salt

1/4 teaspoon black pepper

One package (9 ounces) whole wheat no-boil lasagna noodles

1 cup Mozzarella, shredded  (or more, if you are heavy-handed like me)


Instructions

1. Preheat the oven to 450 degrees.

2. For the filling: In a large saute pan or Dutch oven over medium heat, add 1 tablespoon of the olive oil and heat until shimmering.

3. Add the chopped onion and cook, stirring occasionally, until the onion is translucent and softened, about 5 minutes.

4. Add 1 teaspoon of the minced garlic and cook until fragrant, about 30 seconds.

5. Carefully add the cooked cubed squash and cook, mashing the squash gently, until it is heated through, about 1-2 minutes.

6. In batches, add the kale until it is wilted and softened, stirring frequently.

7. Add the oregano and the red pepper flakes, stirring to combine.  Remove the mixture from the heat to cool.

8. For the béchamel: In a medium saucepan over medium heat, add the remaining tablespoon of olive oil and swirl to coat the pan.

9. Add the remaining 1 and 1/2 tablespoons of minced garlic; cook for about 2 minutes or until the garlic begins to brown, stirring occasionally.

10. Whisk the flour and 1/2 cup of the milk in a small bowl until smooth.

11. Add the milk mixture and the remaining 2 1/4 cups milk to the saucepan; increase heat to medium-high.

12. Bring the mixture to a boil; cook for about 1 minute or until thickened, stirring frequently; remove from heat.

13. Stir in 1 ounce Gruyère, Parmigiano-Reggiano cheese, salt, and pepper; stir until cheese melts.

14.  Coat baking dish  or lasagna pan with cooking spray.

15. Spread 1/3 cup milk mixture in the bottom of dish. Arrange the lasagna noodles over the milk mixture; top with half of squash mixture and 2/3 cup milk mixture, followed by a thin layer of mozzarella.

16. Repeat the layers once, ending with remaining noodles and remaining milk mixture.  Sprinkle the top with any remaining mozzarella cheese.

17. Cover the with foil; bake at 450 degrees for 15 minutes.

18. Remove the foil; sprinkle remaining Gruyère on top. Bake, uncovered, at 450 degrees for an additional 10 minutes or until lightly browned and sauce is bubbly. Let stand 5 minutes.


Source:  Adapted from Cooking Light as part of my monthly contribution to the Cooking Light Bloggers’ Connection.

March 6, 2014 - 10:52 am

Katrina @ WVS - I like all kinds of lasagna! This one looks awesome – thanks for sharing! xx

March 7, 2014 - 11:53 am

Claire @ Simply Sweet Justice - I love butternut squash lasagna! Adding kale sounds great. Well done!

March 8, 2014 - 7:45 am

Helen @ Scrummy Lane - I think it’s worth splurging on the cheese as lasagna usually goes a long way. Your photos have really sold this to me … pinning it!

March 8, 2014 - 7:28 pm

Joanne - I take LOTS OF CHEESE over “light” anyday! This looks like one glorious plate of comfort!

March 10, 2014 - 12:46 pm

Mallory @ Because I Like Chocolate - In my opinion white lasagna is the only way to go, I love that this does not contain tomato sauce!

March 12, 2014 - 5:04 pm

Carol at Wild Goose Tea - I with Joanne with heavy on the cheese. It is amazing to me the spectrum of lasagna recipes! It’s like the world woke up one day and said, “Hey I have an idea! Let’s get down right Wild Wild Wild with lasagna!” Apparently it was pretty easy to get others to sign that petition. I would.

March 16, 2014 - 11:36 pm

Amber Freitas - My favorite veggie (and my 6 year o.d’s too!) is the sweet potato, or yam, I can never remember which is which 🙂 I like the ones with the deep red/orange flesh. They are so delicious as a side dish, baked with just a pat of butter and salt/pepper. Or even as a main dish with some black beans, grated cheese, baked again to melt it then add green onions and sour cream. Yum!

March 16, 2014 - 11:39 pm

Amber Freitas - I also LOVE butternut squash, and have been getting into Kale more lately, so will def have to try this recipe, it sounds declicious (with you all on the heavy handed cheese).

June 18, 2014 - 10:57 am

dolores - I can tell this is a WINNING recipe! Why? The GARLIC in the béchamel. That’s the indicator for me. Have been focused on perfecting my cooking for many years….Garlic is the secret in béchamel. And you nailed it! Will be checking out your blog more frequently!

October 6, 2014 - 6:04 pm

lexilooda - Mmmm, this was delicious. I’m glad you mentioned we could add extra veggies, so I threw in some mushrooms. I also added cashews. (They need to soak for 8 hours before adding them to the lasagna, so they are not so crunchy.) It was a hit! My small-town grocery stores didn’t have the fancy cheeses, so I substituted baby swiss for gruyere and parmesan for the parmigiano-reggiano.

Raspberry Apricot Scones

Scones 2 The Curvy Carrot


I made some “proper” British-style scones after I saw this recipe in Cook’s Illustrated.  As a devoted fan of Downton Abbey, I felt that this recipe might be a little more appropriate than some of the other “American-style” scones I’ve posted in the past.  I also didn’t realize that the season was wrapping up a couple of weeks ago.  I found it a little odd that I had taped two hours worth of Downton but just figured that it was a special or something like that.

I nestled in, cup of tea in one hand and one of these scones in the other.  Sweatpants, warm fuzzy socks, and a freshly clean blanket wrapped around me.  Somehow, as embarrassing as this seems (and yes, I am telling you this), I feel like a part of the cast in a way.  (Sidenote:  have you ever taken one of those “Who Are You?” quizzes that everyone was posting on Facebook a few weeks back?  I totally took the Downton Abbey one and got Anna.  Which made me happy because I love her.)  All I needed was a dress with some serious intricate beadwork and a beautiful long necklace (those costumes have got to be so beautiful in person.)

Anyways, these scones are incredible.  Not too dense, not too light.  Full of flavor…and perfect with any type of tea.  I had some dried raspberries and apricots on hand so I decided to use these here (the original recipe calls for currants.)  Use whatever kind of dried fruit you like here-and play around with different combinations.

When the last episode ended (with warm fuzzes, thankfully, as compared to last season’s traumatizing and tear-inducing finale), I suddenly realized that the season was over.  As bummed as I was about that, these scones made it a bit better.  And now the wait begins for the next season……


Scones 3 The Curvy Carrot


Raspberry Apricot Scones

Servings: 12 scones


Ingredients


3 cups all-purpose flour

1/3 cup granulated sugar

2 tablespoons baking powder

1/2 teaspoon salt

8 tablespoons unsalted butter, cut into 1/2-inch pieces and softened

1/2 cup dried apricots, coarsely chopped

1/2 cup dried raspberries

1 cup milk (I used skim.)

2 large eggs


Scones 4 The Curvy Carrot


Instructions


1. Preheat the oven to 425 degrees and line a rimmed baking sheet with parchment paper.

2.  In the bowl of your food processor, pulse together the flour, sugar, baking powder, and salt in food processor until combined.

3. Add the butter and pulse until fully incorporated and the dough looks like coarse sand, about 20 pulses.

4. Transfer the dough to a large bowl and add in the apricots and raspberries, stirring until combined.

5.  In a separate small bowl, whisk together the milk and eggs, setting aside 2 tablespoons of the milk mixture.

6. Add the remaining milk mixture to the flour mixture and, using rubber spatula, fold together until thoroughly combined.

7.  Transfer the dough to a clean, flat, and floured surface and gather the dough into a ball.

8. Knead the dough until the surface is smooth and free of cracks, 25 to 30 times, and press gently into a disk.

9. Using a floured rolling pin, roll the dough disk into a 9-inch round, about 1 inch thick.

10. Using a 2  and 1/2-inch round cutter, stamp out rounds, pressing down directly without twisting the cutter.  Gather up the remaining dough and roll it out again, then cut out rounds.  Repeat until all the dough is used.

11. Arrange the scones on the prepared baking sheet.

12. Brush the tops of the scones with the reserved milk mixture.

13. Bake the scones until risen and golden brown, 10 to 12 minutes, rotating sheet halfway through baking.

14. Transfer the scones to a wire rack and let cool for at least 10 minutes. Serve scones warm or at room temperature.


Source:  Slightly adapted from Cook’s Illustrated. 

March 4, 2014 - 6:29 am

Lily (A Rhubarb Rhapsody) - My hubby and I are hooked on Downton Abbey too. Coooome on next season! We make scones regularly (we’re Australian). You should try pumpkin scones. 🙂

March 4, 2014 - 4:21 pm

Katrina @ WVS - Proper scones like this are so good – I love the apricots in them 🙂

March 4, 2014 - 8:56 pm

Maria Tadic - If these scones are anything like those pumpkin chocolate chip ones, they’ll be amazing! And I’m so sad Downton Abbey is over the for the year – we have to wait til 2015!!! Craziness…

March 5, 2014 - 12:30 am

Joanne - I am TOTALLY in Downton withdrawal! Maybe if I make afternoon tea a daily thing it will help? Only one way to find out!

March 5, 2014 - 11:42 am

Claire @ Simply Sweet Justice - These have been on my list to make ever since I saw this in Cook’s Illustrated! I blogged about vanilla bean scones in January, so I think I’ll make these and do a post soon. 🙂 Love Downton Abbey!

March 10, 2014 - 10:16 am

dina - they sound delightful. i love scones!

March 10, 2014 - 1:23 pm

Coleen @ The Redhead Baker - These sound delicious! But I’ve never seen dried raspberries. Where would I find them?

March 10, 2014 - 3:17 pm

srlacy - Hi Coleen-

How are you? I found them in the bulk dried fruit section of my local Whole Foods. Yum!

July 8, 2014 - 2:16 am

Erin - Are you sure that you mean to put 2 tablespoons of baking powder into the scones? I’ve never used such an amount. I used 2 teaspoons instead, and they baked as expected…

July 8, 2014 - 9:54 am

srlacy - Hi Erin-

Yes, the recipe is correct as written. I wondered that myself, but Cook’s Illustrated (where this recipe is adapted from-see the link at the bottom) actually writes about adding in more than the usual baking powder to get a lighter, fluffier, aka more “British-style” scone. I had to try it for myself. But, it’s great to know that the usual amount worked just fine for you, too!

December 7, 2014 - 9:53 pm

Alison's Wonderland Recipes - I made one of those “oooooo” noises when I saw these. They look so good!