Vegan Chocolate No-Bake Cookies

IMG_6573

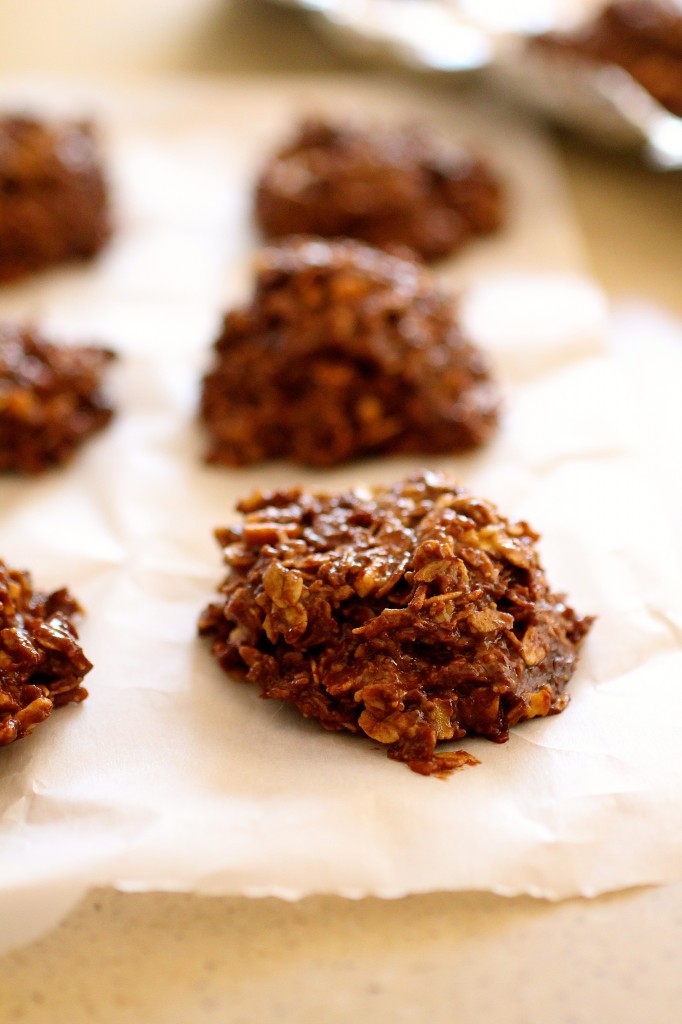
Chocolate No-Bake Cookies.  Ahhhh.  Yes.  My favorite cookie in the entire world.  A heavenly concoction of chocolate, peanut butter, and oatmeal.  Here’s a fantastic old-school version, one of my posts from the early days.

But, I can’t do it anymore.  I still want my favorite chocolate cookie, but I can’t justify consuming so much butter and sugar in a single sitting (and yes, I can down a lot of these cookies at once).  The other day I went to make some fudge and realized I didn’t have any sugar in my pantry.  I can’t even remember the last time I used sugar in a recipe, even (it’s been at least a couple of months-which is actually shocking, considering I felt like last year I always had it in my shopping cart).  I suddenly realized that my eating habits have drastically changed in the past year. And I am perfectly happy with that (and also ten pounds lighter).  It feels damn good.

So when a recent chocolate craving hit, I knew I wanted these.  But just an alternative vegan version.  Made with coconut oil (seriously, is there anything that coconut oil cannot do?  It’s like this amazing do-it-all miracle drug.  I’m going through it like water.), these have a definite mild coconut taste, so if you aren’t a coconut fan, you have fair warning.  Also, another side note: depending on the brand/solidity of your coconut oil and the amount of natural oils present in the peanut butter you use, you will want to chill these cookies.  Kept at room temperature on a hot day, these cookies were a little mushy and soft (but personally, I kind of like them this way.)  I decreased the amount of sweetness substantially from the original recipe and still found these cookies to be sweet, but not as sweet as the original version I’m used to. So if you like things a bit on the sweeter side, increase the amount of agave nectar to about 3/4 cup.

No white sugar.  No butter.  A chocolate cookie with actual flavor?  Could it be true?

We have a winner, ladies and gentlemen.


IMG_6576


Vegan Chocolate No-Bake Cookies

Servings: about 15 cookies


Ingredients

1/2 cup agave nectar (I used light agave nectar)

1/2 cup coconut oil

1/2 cup cocoa powder

2 cups rolled oats

1 cup natural peanut butter

1 cup unsweetened coconut flakes

1 teaspoon vanilla extract


Instructions

1. In a heavy-bottomed saucepan over medium heat, combine the agave nectar, coconut oil, and cocoa powder, stirring to combine.

2. Bring the mixture to a boil and let boil for 2 minutes.

3. Remove the mixture from the heat and stir in the oats, peanut butter, coconut, and vanilla extract, mixing until thoroughly combined.

4. Drop the mixture by generous tablespoons onto waxed paper or parchment paper.  Let cool slightly and then chill.


Source:  Adapted from All Recipes.


June 18, 2013 - 1:59 pm

Miss Messy - These look like such fabulous little cookies 🙂

June 18, 2013 - 3:39 pm

Moira - I love the idea of coconut oil as a substitute! Can’t wait to try these-no bake cookies are definitely one of my weaknesses 🙂

June 18, 2013 - 3:54 pm

mr. & Mrs. P - These sound so wonderful.. YUM!

June 19, 2013 - 1:56 pm

Maria Tadic - These look super yummy – and super quick! I bet these would be good crumbled over ice cream! Definitely trying that!

June 19, 2013 - 2:11 pm

srlacy - Oooh, that WOULD be good!

June 19, 2013 - 2:32 pm

molly - these look so good! i’m not a big coconut fan… any substitution suggestions for the coconut oil? (i figure i can just leave out the coconut flakes)

June 19, 2013 - 2:41 pm

srlacy - Hi Molly-
I don’t have any other suggestions for the coconut oil, and the coconut flakes actually help really keep the cookie together. If you are ok with a non-vegan version, I would recommend the one I link to in the intro-it’s so good!

June 20, 2013 - 11:15 am

Kelli @ The Corner Kitchen - wow! coconut, peanut butter AND cocoa….these sound like the best no-bakes ever! These are definitely making their way to my kitchen 🙂

June 20, 2013 - 4:52 pm

Maggie @ Sunnyside Up Smile - I love chocolate and I love cookies! Perfect! I’ve been wanting to experiment with vegan cookies lately. These look great 🙂

June 27, 2013 - 5:41 pm

Sue - i just made these, and while they have a great choc/coconut/peanutty taste, they are a bit dry and crumbly. I feel like I should have added some almond milk.

June 27, 2013 - 6:48 pm

srlacy - Hi Sue-
Mine were the complete opposite. As I said in the post, it probably has something to do with the oil content of your peanut butter. If you are using a natural peanut butter with oils, the cookies should be more moist.

June 29, 2013 - 10:14 pm

Pam - What would be a good substitute for the agave nectar?

June 29, 2013 - 10:17 pm

srlacy - Hi Pam-
You can use honey if you want instead! 🙂

April 21, 2014 - 10:21 pm

kepod - No-bake cookies set because you’re kind of making a soft candy with the liquid you cook on the stove. If your results are crumbly, you might be cooking things on the stove too long.

Someone else’s comment that different peanut butters might have different levels of oil content is also a really good point.

October 31, 2014 - 3:31 pm

Easy Vegan No-Bake Chocolate Cookies - […] I came across this recipe on a site called The Curvy Carrot, and it was so f**king easy and required a minimal tweak to make it peanut-free that I went for it, […]

November 29, 2014 - 4:58 pm

Judy - Hi, Any sub for cocoanut flakes? I don’t have them. Thanks Judy

Blueberry Buckwheat Pancakes

IMG_5951


I love this time of year, solely for the mass amounts of beautiful produce that’s beginning to be in season.  Blueberries, strawberries, raspberries, and even..peaches (although I don’t trust them yet..I feel that one of the biggest food disappointments out there other than biting into a “chocolate chip cookie” and getting oatmeal raisin instead…is when you bite into what looks like a ripe, glowing peach…only to get that woody mushy stuff.  Ick.)

So I’m eating berries like it’s my job right now. I literally bring in giant containers of them and snack all day long at work.  It’s nice because I’m killing two birds with one stone: I’m not starving all the time and I’m eating super clean, healthy food.

Incorporating some fresh blueberries into pancakes is pretty simple.  Incorporating some fresh blueberries into whole wheat/buckwheat pancakes that don’t taste completely bland is tricky.  Now, I’ll admit: these pancakes don’t have any extra sweetener here in the way of sugar (bonus), so this recipe relies heavily on the ability of your blueberries to contribute to the sweetness of the cakes.  You want to use the freshest, brightest, and juiciest berries you can find (frozen berries will also work well here if you have some on hand). I also highly recommend serving these pancakes with a maple-blueberry syrup  (see below).  You can also add in whatever kind of fruit you have on hand-I thought about adding in some mashed, ripe banana, as well (but then I completely spaced it and remembered as I was halfway through cooking the pancakes…doh).  And while I don’t eat a lot of gluten-containing products anyways, somehow eating things like pancakes made with whole wheat and buckwheat seem a bit healthier than pancakes made with traditional white flour. And I feel better.  Next time I might throw in some ground flax seed and protein powder, and I’ll be set.  But one thing at a time, people.  Let’s not get too crazy.


IMG_5929


Blueberry Buckwheat Pancakes

Servings: 4-6


Ingredients

For the pancakes:

1 and 1/4 cup whole wheat pastry flour

3/4 cup buckwheat flour

1 and 1/2 teaspoon baking powder

1 and 1/2 teaspoon baking soda

1/4 teaspoon salt

2 large eggs

2 and 1/2 cups buttermilk

2 tablespoons coconut oil, melted

1 teaspoon vanilla extract

1 cup fresh blueberries

Cooking spray

For the maple-blueberry syrup:  (this makes enough for about 3-4 tablespoons per serving.  If you want more syrup, increase the amounts accordingly.)

3/4 cup fresh blueberries

1/2 cup maple syrup


Instructions

1. For the pancakes: In a large bowl, whisk together the flours, baking powder, baking soda, and salt; set aside.

2. In another bowl, whisk together the eggs, buttermilk, melted coconut oil, and vanilla.

3. Add the egg mixture to the dry ingredients and stir to thoroughly combine.

4. Gently fold in the blueberries, mixing until incorporated.

5. Meanwhile, heat a non-stick frying pan over medium heat and lightly spray with cooking spray.

6. Pour the batter in 1/3-cup portions onto the prepared frying pan, letting the pancake cook until it forms large bubbles on its surface (about 2-3 minutes or so).  Gently flip the pancake and cook for another minute or so, or until cooked through.  ***Here’s a good time for you to get the maple-blueberry syrup ready.  See below.

7. Transfer the pancake to a plate (cover it to keep the pancakes warm), and repeat for each pancake (re-spraying with cooking spray as necessary), until you have used all of the batter.

8. For the maple-blueberry syrup:  In a small saucepan over low heat, combine the blueberries and the maple syrup.  Cook over low heat until the blueberries have popped, about 10 minutes or so.  Serve the syrup over the pancakes.


Source:  Adapted from Williams-Sonoma.

June 16, 2013 - 9:55 am

Katrina @ Warm Vanilla Sugar - These sound awesome!! Love this idea for breakfast 🙂

June 16, 2013 - 5:55 pm

branny - Your first photo is wonderful.

September 3, 2013 - 3:08 pm

Blueberry Buckwheat Pancakes | A Hint of HoneyA Hint of Honey - […] (Adapted from Williams-Sonoma via The Curvy Carrot) […]

May 2, 2014 - 10:21 am

The Truth About Coconut Oil | Bean A Foodie - […] Blueberry Buckwheat Pancakes from The Curvy Carrot […]

Frozen Matcha Slushies

IMG_5656


Green tea is a little like my kryptonite right now.  (I never thought I would say that.)  But it’s true.  Everyday, I lug my huge plastic water jug into work, where (after I’ve downed a giant traveling mug’s worth of black coffee) I’ll promptly sprinkle in some of my matcha green tea powder that I get down the street from a spice shop.

I’ll admit it: at first, I didn’t care for the grassy, earthy taste.  I would much rather have gone for another coffee, but it seems like every coffee drink I consume after 2 pm leaves me awake and tossing/turning until 2 am.  Not fun.  But once I read about many of the health benefits of green tea, especially matcha, I was hooked (and even though it does have caffeine in it, it somehow doesn’t mess with my chemistry as much…or maybe it’s just a placebo effect.  Whatever.  It works for me.). And now when I drink plain water at home, it’s a little bit of a let down.

So, when I saw this recipe in a recent issue of Vegetarian Times, I was intent on making a giant batch of this stuff for myself as a treat.  And it totally has been.  I make giant batches on the weekends, then freeze it in a tightly sealed casserole dish, and when I want a nice slushie, I’ll just let it thaw for about 10 minutes, pop it in the blender with some soy milk, and boom!  a guilt-free icy treat (especially to drink while reading a nice gossip magazine on my balcony on a sunny afternoon…with a girly straw.)

No grassy, earthy taste here.  Well, maybe a little.  But the soy milk and the agave nectar actually sweeten it up quite a bit, which is a nice change from what I am used to.  Adjust your sweetness here to your own tastes, and you can use whatever kind of “milk” you like-a vanilla almond milk would be pretty good.

Bring on the antioxidants, people!


IMG_5632


Frozen Matcha Slushies

Servings: about 4 large slushies


Ingredients

2 tablespoons matcha tea powder

2 cups soy milk (I used a vanilla flavor), plus ¼ cup more for each slushie

⅓ cup agave nectar


Instructions

1. Bring 2 cups of water to a simmer in a medium saucepan over medium-high heat.  (Do not let the water boil.)

2. Whisk the hot water and the matcha in a boil; let cool for about 30 minutes or so at room temperature.

3. Whisk the soy milk and the agave nectar into the matcha/water mixture, mixing until combined.

4. Pour the mixture into a freeze-proof container (alternatively, the original recipe has you pour the mixture into an ice cube tray-brilliant!  Except I don’t have an ice cube tray.  Oooops.), seal, and freeze.

5. For each slushie: Place about 1 cup or so (however much you like or, as the original recipe states: 6 frozen cubes) in  a blender, and add 1/4 cup soy milk. ***If you don’t have an ice cube try, like me, then let your container sit out at room temperature for about 10 minutes or so, then use a warm ice cream scoop to portion out your slushie.  Run your ice cream scoop under hot running water to warm it up.

6. Blend until smooth.  Drink with a girly straw.


Source:  Directly from Vegetarian Times.

June 13, 2013 - 2:03 pm

Moira - I have a cup of green tea every afternoon for many of the same reasons, but I’ve been grumbling about it now that it’s 1000 degrees here in Oklahoma. This is the perfect way to get my green tea in during the summer 🙂 Thanks!

June 13, 2013 - 11:53 pm

mr. & Mrs. P - Need to buy macha powder asap!

June 14, 2013 - 4:22 pm

Les petites pertes de temps // 2 | Une bravade - […] Slush au matcha: S’il-vous-plait! […]

June 15, 2013 - 5:45 am

Matcha Tea | How Do You Brew Tea - […] Frozen Matcha Slushies » The Curvy Carrot http://www.thecurvycarrot.com/Everyday, I lug my huge plastic water jug into work, where (after I've downed a giant traveling mug's worth of black coffee) I'll promptly sprinkle in some of my matcha green tea powder that I get down the street from a spice … […]