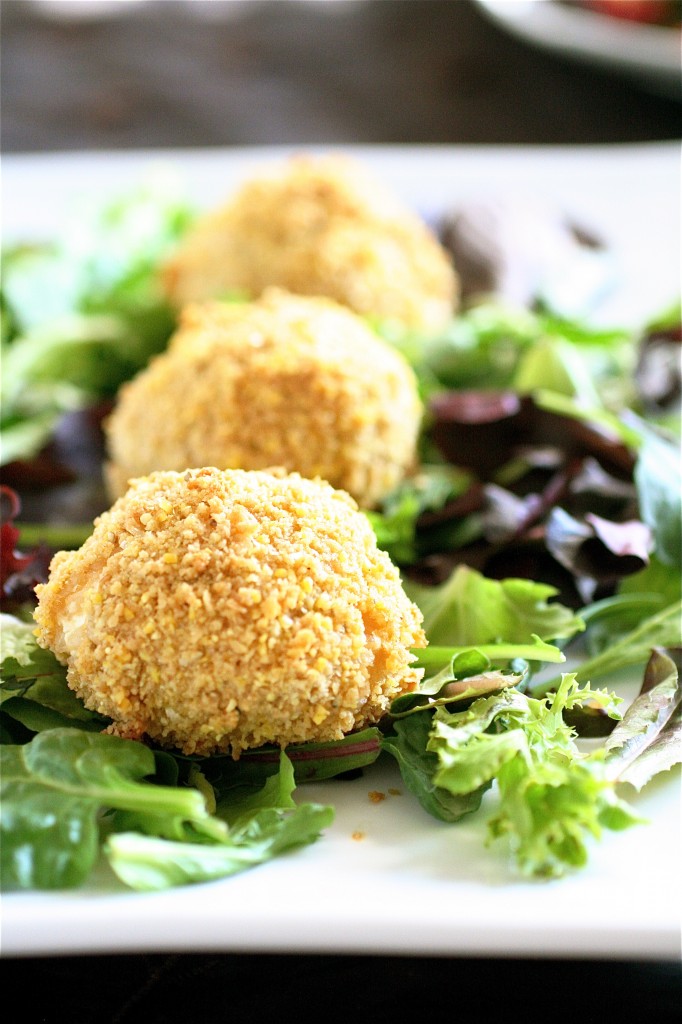
Baked Risotto Balls


I really tried to eat a whole pan of risotto by myself.  I tried, but I couldn’t do it.  So I needed an easy way to use up all the leftovers without making me feel like I was eating risotto again.

Enter these baked risotto balls.  Ingenious. And very very tasty.   They would be perfect as a quick weeknight meal, served over some greens.

The breading prep is the longest part of the whole process, if you already have the cold risotto on hand.  And you could add in different veggies to the risotto itself, or add some seasonings to the breading.  If you like panko over bread crumbs, I am sure that it would work just as well.  You could also omit the cheese filling if you want to cut back on fat and calories, but I think you deserve to treat yourself to some deliciousness. 😉

As I said, these were fantastic on top of greens as part of a large salad, but they are fine on their own.  The following night, I reheated them again and served them as an appetizer with dipping sauces (I would recommend marinara or, my personal favorite, Ranch dressing.)

A leftover make-over.  I like it.
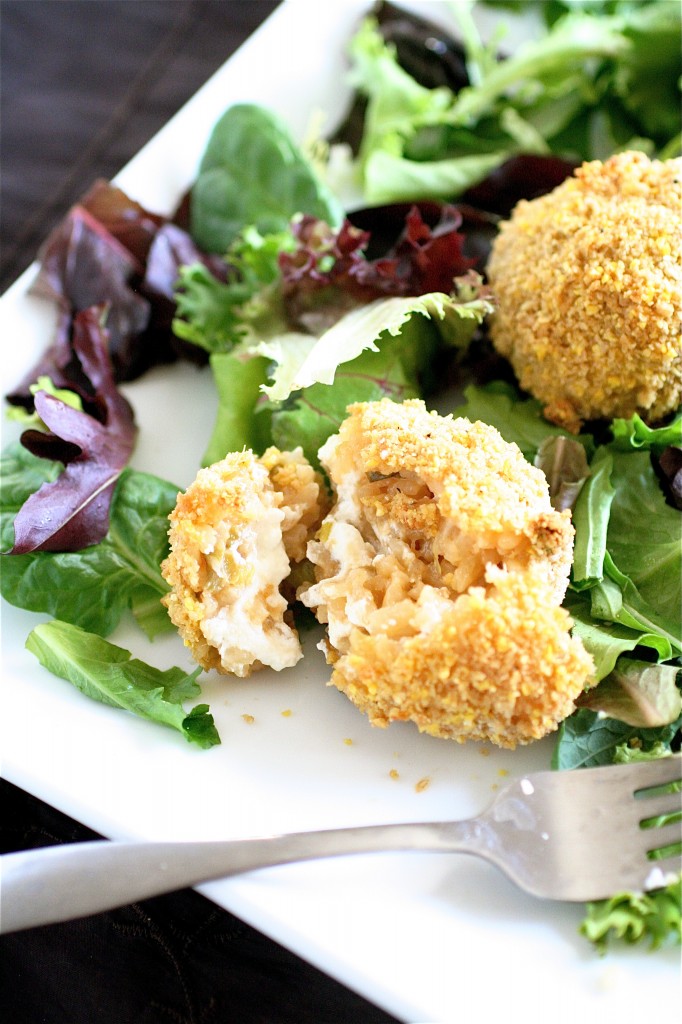
Baked Risotto Balls

Servings: about twelve 2-3 inch balls


Ingredients

2-3 cups cold, cooked risotto

4 ounces soft cheese, such as goat or Boursin cheese

1 cup bread crumbs

1/2 cup cornmeal

2 large eggs, lightly beaten

1-2 tablespoons milk

Salt and pepper, to taste
Instructions

1. Preheat the oven to 375 degrees and spray a rimmed baking sheet generously with cooking spray.

2. Using a spoon and the palm of your hand, shape about 1-2 tablespoons of the cold risotto into a flat circle  in the palm of your hand.

3. Place about 1 teaspoon of the soft cheese (of your choice) into the center of the risotto, then place another 1-2 tablespoon of the risotto on top of the cheese, sealing it in place.  Lightly roll the risotto into a ball and place on a rimmed baking sheet.

4. In a medium bowl, whisk together the bread crumbs and the cornmeal.

5. In a small bowl, whisk together the eggs and the milk.

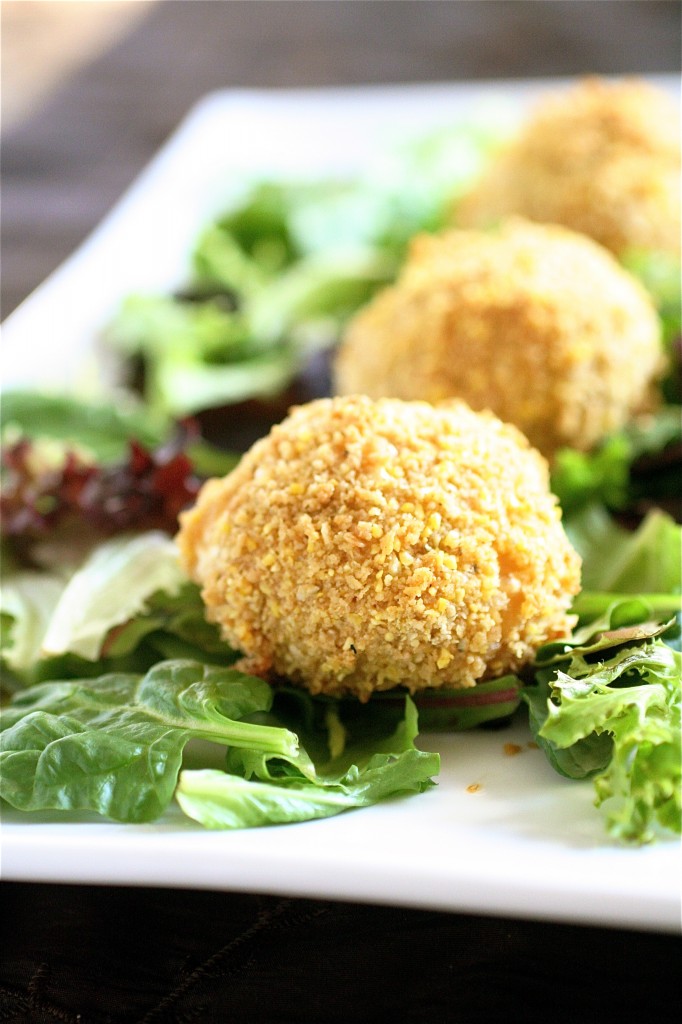
6. Lightly roll each risotto ball into the bread crumb mixture, followed by the egg mixture, and then again into the bread crumb mixture (this double coating of breading makes them extra crispy.) Place each one back onto the baking sheet.

7. Generously spray the tops of the balls with cooking spray.

8. Bake until lightly golden and crispy, about 30 minutes.  Serve immediately.

Source:  Slightly adapted from Guilty Kitchen.


June 10, 2012 - 10:18 am

Kia @ A View From Here - Oh-My-Goodness!
I think it sounds worth making a risotto just to make these. Such a fab idea.

June 10, 2012 - 12:05 pm

Chung-Ah | Damn Delicious - I absolutely LOVE risotto so I’m sure these balls of heaven would send me to the moon!

June 11, 2012 - 2:13 am

Ashley @ Wishes and Dishes - What a great idea for leftover risotto!

June 11, 2012 - 2:02 pm

Ann P. - These look delicious! I’ve had something like these before for an appetizer. I think they were called arancini 🙂

June 11, 2012 - 4:21 pm

Menu Plan Monday June 11 | A View From Here - […] Eggs with toast (maybe poached or scrambled) Snack – Couscous stuffed pepper Dinner – Baked risotto balls with […]

June 18, 2012 - 5:12 am

Menu Plan Monday – June 18 | A View From Here - […] over pork from yesterday)Wednesday – Honey & mustard chicken saladThursday – Baked risotto balls with salad (that I didn’t get around to last week)Friday – Salad (not sure what kind […]

July 30, 2012 - 7:26 am

Baked Risotto Balls | Lukor.net - […] View the article’s source Autor: srlacy […]

March 25, 2013 - 6:11 am

Bob - Tried this last night. Used fresh mozzarella and that did not work because the arancini absorbed it. Use the harder block of mozzarella.

May 10, 2013 - 9:52 am

Baked Risotto Balls - […] source:  thecurvycarrot.com […]

December 22, 2013 - 7:19 pm

Christmas with the Dowes | Designs on Dinner - […] also had hummus and baba ganoush with vegetables, risotto balls, stuffed jalapenos, Scandinavian pickled herring bites, mozzarella cheese sticks with marinara […]

February 26, 2015 - 1:15 pm

Susan - Recipe looks wonderful!
Is there a way to print this recipe without the comments and images…?

Cheddar Cheese Risotto

I know, I know, I know. It’s summertime, and we should all be eating salads.  Nothing heavy.  Nothing creamy.  Nothing that’s not bathing-suit (and lots of sunscreen) friendly.

But, I’m breaking the rules.  Whatever.  I wanted cheese, something savory, and something that would go down nicely with a glass of wine and a side salad (there, got a salad in.)

Enter this cheese risotto.  I had a whole bunch of Arborio rice left in my pantry, and, given that I live in an area of the country with amazing creameries and fresh cheese, I figured I could blend the two together to get a nice evening meal.  And it hit the spot.

So, it’s a risotto, and while I am in no way a risotto afficianado, it came together rather nicely-even with a slightly-longer-than-I-want-to-spend-on-a-weeknight kind of meal.  I experimented with leftovers (post to follow) and hit upon a total winner.

So, if you’re down for some good-hearted comfort food mixed with a little bit of love (it’s because of all that stirring…), this meal (summer or not) is for you.

Cheddar Cheese Risotto

Servings: 4


Ingredients

1 tablespoon unsalted butter

1 tablespoon vegetable oil

2 scallions, chopped, plus more for garnish

1 and 1/2 cups Arborio rice

1/2 cup white wine

1/2 teaspoon Dijon mustard

4 cups hot vegetable stock

1 cup cheddar cheese, shredded


Instructions

1. In a deep sauté pan over medium-low heat, melt the butter and oil.

2. Add the scallions and cook, stirring frequently until softened, about 2-5 minutes or so.

3. Add the rice and cook for one minute.

4. Increase the heat to medium-high, and add the white wine and mustard, stirring until completely absorbed.

5. Stirring constantly, add the hot vegetable stock, one cup at a time, adding each cup after the previous is completely absorbed.  Cook the rice until it is al dente (mine took about 20 minutes of old-fashioned stirring)

6. Add the cheese and stir gently until completely melted.

7. Divide the risotto evenly among your serving bowls and top with scallions, if desired.


Source:  Barely adapted from Hostess with the Mostess.


June 8, 2012 - 5:52 am

Becca @ Amuse Your Bouche - Yum! I love risotto and I LOVE cheese – I do enjoy playing around with flavours, but sometimes you can’t beat a simple cheesy risotto. And I totally still eat things like this in the summer – I just posted a hearty soup recipe and thought the same thing about that!

June 8, 2012 - 7:51 am

Blog is the New Black - Now this my friend, is a TGIF meal for sure!

June 8, 2012 - 8:04 am

Katrina @ Warm Vanilla Sugar - This sounds so tasty!! Yum!

June 8, 2012 - 10:17 am

Emily @ She Makes and Bakes - I love risotto and usually use parmesan, but I love the cheddar cheese. I’m trying this next time I make it!

June 8, 2012 - 5:05 pm

Emily - This looks so delicious and like something my daughter would love. I’ll be making it soon. Thanks for the recipe!

June 8, 2012 - 6:32 pm

Ann P. - risotto… ultimate comfort/fancy food! Great recipe 🙂

June 9, 2012 - 5:11 am

Claire - Gotta try this! It’s time to reward ourselves!

June 10, 2012 - 5:01 am

The Curvy Carrot » Baked Risotto Balls - […] really tried to eat a whole pan of risotto by myself.  I tried, but I couldn’t do it.  So I needed an easy way to use up all the […]

June 30, 2012 - 9:57 pm

Don Devine - I am having the darnedest time learning how to cook risotto and I think this recipe has helped me immensely. After stirring for the 20 minutes it comes out good and al dente but is that how its supposed to be? My wife complained that she wanted it “more done” and promptly put hers back in the pan added water and cooked it more!!! I was a little peeved to say the least. But if I was to cook it past the al dente stage, wouldn’t it be mushy and starchy? I guess my question is, to have true risotto, restaurant quality risotto, one must serve it hot, al dente and not gooey and mushy?

July 4, 2012 - 11:08 am

srlacy - Hey Don-

I totally agree with you, but I also know people who like their risotto softer. All the “good” risottos I have had in fancy restaurants definitely were more on the al dente side.

August 10, 2012 - 9:48 am

Julia - AMAZING! I made this last night and it was hard for two of us not to destroy the entire recipe. Will definitely make again….very soon!

May 13, 2014 - 5:00 am

Lemon Spinach Artichoke Risotto » The Curvy Carrot - […] minutes for several meal’s worth of food isn’t so bad.  For a cheesy cheddar risotto, click here.  For a nice mushroom risotto, click here.  And for a spring primavera risotto, click here. […]

February 19, 2015 - 12:49 am

11 Romantic Risotto Recipes Perfect for Valentine's Day | Eat Well Live Well - […] Talk About relief Meals with a flowery twist! Think Of this risotto recipe as your permission to devour fancy macaroni and cheese with a facet of white wine for your date.Photo and recipe from The Curvy Carrot […]

Summer Fruit Quesadillas

I can’t help myself.  There’s a whole bunch of awesomeness happening right now with summer produce.  The first bits of summer are popping into farmers’ markets and the local grocery stores.  I’m pretty pumped.  Summer has to be one of my healthiest eating seasons.  I cannot wait to get some tomato plants going once I make this big move.

So I’m trying to sneak some of this freshness into every meal.  I have a hard time just eating straight fruit or straight salads unless I’m in the mood for it, so getting my 5-a-day can sometimes be a challenge.  But not with easy, weeknight recipes like this one.

Now, granted, it’s not *the* healthiest weeknight meal because of the cheese.  But, instead of going with a traditional quesadilla with salsa and sour cream, this one had a sweet yet super fresh flavor that didn’t need any condiments.  It was a refreshing switch from my usual, and I like that.

Use either peaches or nectarines (whatever looks the best) and feel free to add in any other fresh ingredients that you might have on hand.

Summer Fruit Quesadillas

Servings: 2


Ingredients

2 (9-inch) flour tortillas

Cooking spray, for spraying the non-stick pan

1 cup Monterey Jack cheese, shredded or sliced thinly

1/2 cup Queso Fresco, crumbled

2 nectarines, halved, pitted, and very thinly sliced (I left the skins on, but feel free to peel them if you want)

1 tablespoon cilantro, chopped

1 jalepeño pepper, seeded and thinly sliced into rounds (I only used half of one because I didn’t want to go overboard)

Instructions

1. Lightly spray a non-stick frying pan with cooking spray over medium heat.

2. Place one tortilla, face down, in the pan and lightly sprinkle the cheeses, fruit, cilantro, and jalepeno on top of each other.

3. Place another tortilla on top of the mixture, and let cook, until the original side is lightly golden, about 2-3 minutes.

4. Carefully flip the quesadilla over in the pan and let the opposite side cook until lightly golden, about 2-3 minutes.

5. Repeat with the second quesadilla, re-spraying the pan if necessary.  Serve immediately.

Source: Adapted from Sur la Table.


June 6, 2012 - 5:26 am

Blog is the New Black - I adore nectarines- these look so incredibly refreshing for summer!

June 6, 2012 - 7:35 am

Katrina @ Warm Vanilla Sugar - Oh wow, these sound so fabulous!

June 6, 2012 - 9:55 am

Jillian {Her Split Ends} - SOOOO yummy…and what a great refreshing treat for summertime fruit. Love this…trying it this weekend!!

Cheers
~ Jillian
http://www.hersplitends.com

June 6, 2012 - 5:10 pm

Christina @ This Woman Cooks! - What a beautiful treat!

June 6, 2012 - 5:44 pm

Caralyn @ glutenfreehappytummy - oh my oh my! those look SO delicious and refreshing! i love the idea! thanks for sharing!

June 6, 2012 - 11:42 pm

Rachel - Brilliant! I looove cheese and fruit (apple butter on all my grilled cheese sandwiches, please) and melty quesadillas! This would be such a fun summer party food.

June 7, 2012 - 4:09 pm

Chung-Ah | Damn Delicious - What an awesome dish. I would have never thought to add fruit to a quesadilla but now I can’t wait to try it!

June 7, 2012 - 7:43 pm

Ann P. - This may be the first fruit quesadilla i’ve seen, ever! Beautiful photos, and I love that you added the jalapeno in there–that’s an awesome combo with the sweet nectarines. I’ve heard sugar neutralizes the capsaicin’s spiciness, so i consider that ingenius. 🙂

June 7, 2012 - 9:28 pm

Krissy's Creations - LOVE this recipe! This is definitely my type of Quesadilla. Stocking up on nectarines and jalapenos tomorrow!

June 11, 2012 - 7:37 pm

Christina - Goodness me – fruit between tortillas. For dinner. Why did I not think of this already? Enjoy – I know I sure will!

June 13, 2012 - 12:20 pm

Kelsey - What a gorgeous summer meal. I’d eat these for breakfast, lunch, or dinner!

August 1, 2012 - 4:43 pm

How I’m Using My CSA Box {Week of 8.1-8.8} | More Than Mundane - […] Summer Fruit Quesadillas :: The Curvy Carrot […]

September 2, 2012 - 8:23 am

Stacy - Wonderful….loved it! Will be making again, thanks tons for the recipe.

June 27, 2013 - 6:33 am

6 Ways to Keep Cool in the Kitchen this Summer - […] Quesadillas: Get creative with your quesadillas! Try Strawberry and Leek Quesadillas or Summer Fruit Quesadillas. […]

May 14, 2014 - 4:45 pm

"Peaches are my favorite" - Mommy Eats Texas - […] Texas peaches from the Hill Country. It doesn’t get much better than this. Expect a LOT of peach dishes in the next couple of months. This one was affectionately adapted from The Curvy Carrot. […]