Chocolate Baklava

Baklava1 The Curvy Carrot


So baklava has always been one of those mysterious yet super intimidating desserts that I have always wanted to try.  I’ll start reading the instructions and think, “yes, I’ve got this”, but then all the layering of phyllo (or filo) dough just turns me off. Too much work.  I’d rather just throw together some chocolate cupcakes and call it a day.

One super cold and dreary Milwaukee weekend, however (thankfully those seem to be a thing of the past), I decided to forge, full steam ahead, and make a giant pan of baklava as a kind-of-dreaded but highly-desired project.  (a not so cheap project, either-as pistachios in bulk aren’t the cheapest nut to purchase.) As a side note, the original recipe called for hazelnuts, but, my grocer was actually out of hazelnuts in bulk-so I improvised with using different amounts of the other nuts (play around with this on your own, if you like) I figured since I had spent more than usual on ingredients, I was committed.  And so I began.

And you know what?  It wasn’t so bad.  Yes, you have to be vigilant and make sure that the phyllo dough doesn’t dry out during the layering process.  Yes, sometimes the dough tears and breaks up a bit if it does get a little dry (don’t worry-I still ate those parts).  But it’s really not so hard to make once you get the hang of it.

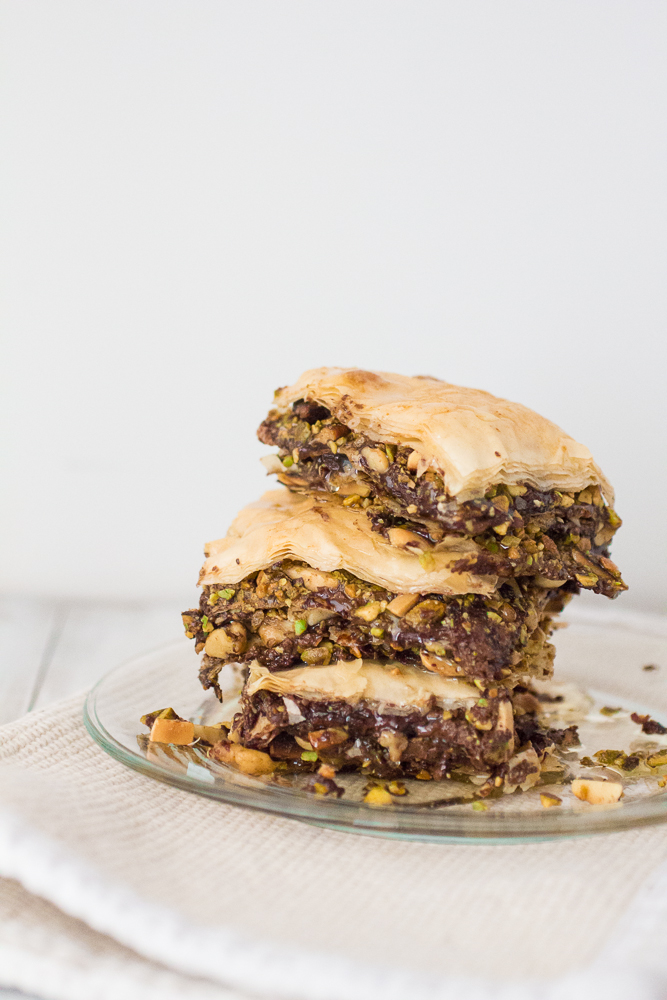
The end product?  Worth every little dried piece and tear.  Chocolate hazelnut spread (aka Nutella) with honey and pistachios equals pure perfection in my book.  It may not be the prettiest dessert on the planet, but it serves its purpose oh so well.
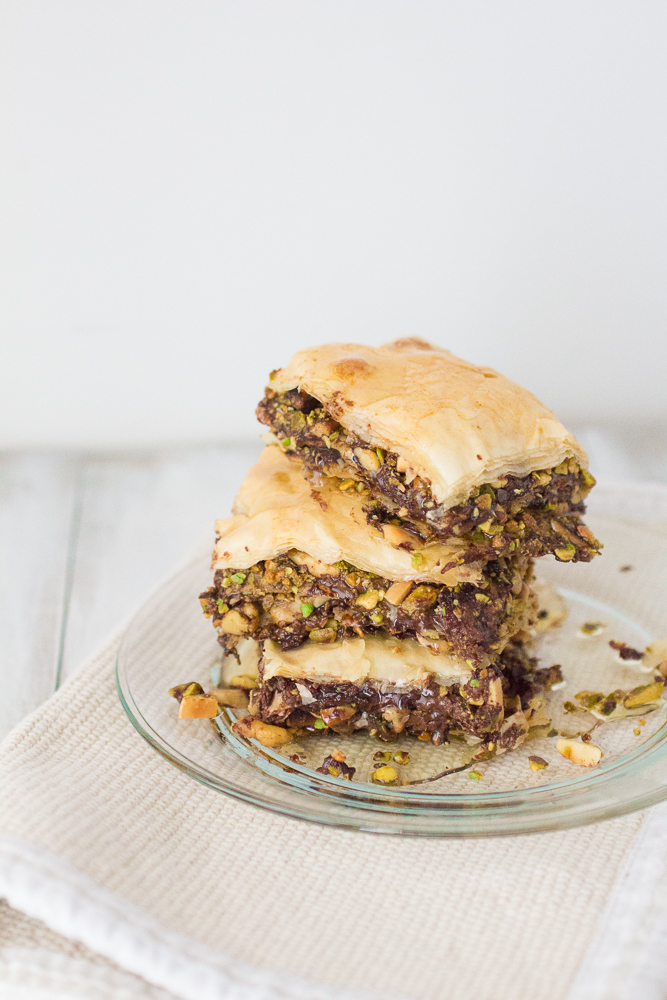
 

Baklava2 The Curvy Carrot


Chocolate Baklava

Servings: about 24 pieces (depending on how you cut them)


Ingredients

3/4 cup honey

1/2 cup water

One 3-inch cinnamon stick

1 cup chocolate hazelnut spread (aka Nutella)

3/4 cup roasted unsalted pistachios, coarsely chopped

1/2 cup blanched toasted almonds, coarsely chopped

1/2  cup toasted walnuts, coarsely chopped

1/2 teaspoon ground cinnamon

1/8 teaspoon salt

24 (14 x 9-inch) sheets frozen phyllo dough, thawed

1/2 cup unsalted butter, melted

Special equipment: a candy thermometer


Instructions

1. In a medium saucepan over low heat, stir together the honey, water, and the cinnamon stick.  Stir until the honey dissolves.

2. Increase the heat to medium and cook, without stirring, until a candy thermometer reads 230 degrees (mine took about 8-10 minutes or so.)  Remove the saucepan from the heat and keep the mixture warm.  (Discard the cinnamon stick.)

3. Preheat the oven to 350 degrees.

4. In a small saucepan, heat the chocolate hazelnut spread over medium heat until melted.  Keep warm.

5.  In a separate bowl, mix together the pistachios, almonds, walnuts, ground cinnamon, and salt.

6. Spray a 13×9-inch baking dish with cooking spray.

7. Working with 1 phyllo sheet at a time (cover remaining dough with a damp tea cloth or light towel to prevent drying), place 1 phyllo sheet lengthwise in bottom of prepared pan, allowing the ends of the sheet to extend over the edges of the dish; lightly brush with the melted butter.

8. Repeat with 5 phyllo sheets and melted butter.

9. Spread about 1/3 cup of the melted chocolate hazelnut spread over the layered phyllo.

10. Sprinkle evenly with about 1/2 cup of the nut mixture.

11. Repeat steps 8-10 twice with phyllo, butter, chocolate hazelnut spread, and nut mixture.

12. Top the last layer of nut mixture with remaining 6 sheets phyllo, each lightly brushed with butter.

13. Press the baklava gently into the pan.

14. Using a sharp knife, cut the baklava into your desired serving portions.

15. Bake until the phyllo is golden, about 35 minutes. Remove from oven.

16. Drizzle the warm honey mixture over the baklava; let cool.


Source:  Barely adapted from Cooking Light, as part of my monthly contribution to the Cooking Light Bloggers’ Connection.

April 10, 2014 - 6:27 pm

Ashe - Looooove love love the idea of CHOClava! (Oppourtunity was given and I HAD to take it lol)

April 10, 2014 - 7:31 pm

srlacy - Oh….hell….yesssss. Best comment ever. 🙂

April 10, 2014 - 11:50 pm

Joanne - I actually think that it IS one of the prettiest desserts on the planet!! I love baklava (and may or may not be marrying a Greek boy because of it). This chocolate version sounds divine.

April 12, 2014 - 3:15 pm

Helen @ Scrummy Lane - Making baklava is definitely on my food bucket list as well. It seems so obvious now that you have suggested it, but I wouldn’t have thought of adding chocolate. Love it!
Beautiful pin-worthy photos, too!

April 14, 2014 - 8:40 am

charlotte - When I saw “chocolate baklava” on foodgawker, I thought, “Of course! Brilliant combination” – and as of this morning, more people had “favorited” it than “looked” at it. Ha ha!

April 14, 2014 - 1:43 pm

CakePants - Yummm…this looks SO scrumptious! After making spanakopita, I realized that I don’t have enough patience with phyllo dough to make baklava…but this recipe is making me reconsider, because I *need* this in my life. Immediately.

Cheesy Roasted Garlic Bread

Garlic Bread1 The Curvy Carrot

I’m a firm believer in super cheesy, super garlicky garlic bread.  If I’m going to dive right into a carb, I prefer it be loaded with butter and cheese.  Go big or go home, right?

This bread was sort of an after-thought accompaniment to this pasta dish.  I had originally planned on making some garlic bread for a side and had even roasted a giant head of garlic the night before in preparation.  But then, as I got completely wrapped up in the process of making the pasta, I forgot about the bread.  I put the pasta on hold so I could make the bread (actually, I just wanted an excuse to eat so much cheese).  Best decision ever. (In fact, I sheepishly admit to you that I ate the bread, by itself, as an entire meal on its own one night. No regrets.)

I used cheeses that I had on hand (mozzarella and cheddar cheese), but you could use whatever variation you like.  If I would have had some ricotta, I would have layered that on, too (the more the merrier).  Throw on some spinach or sun-dried tomatoes for a flat-bread-ish kind of feel.  I used half a loaf of ciabatta bread here-but you could use French bread or really anything you like.  And don’t feel like you have to stick to the rules here-eyeball this recipe. If you feel like you want more cheese, add more cheese.  If you want more butter, add more butter.  And if you are afraid of so much garlic, taste the garlic butter as you go.  And don’t forget to enjoy the process.

 Garlic Bread3 The Curvy Carrot


Cheesy Roasted Garlic Bread

Servings: about 6-8 slices of bread (depending on how wide you slice the bread)


Ingredients

1 large head of garlic

1 tablespoon extra-virgin olive oil

Salt and pepper

6 tablespoons unsalted butter, at room temperature

1/2 teaspoon garlic powder

1/2 teaspoon salt

1/2 loaf of ciabatta bread, sliced horizontally (I used both horizontally-sliced halves).

1 cup mozzarella cheese, shredded

1 cup cheddar cheese (I used mild cheddar), shredded

Parsley, for topping (optional)


Instructions

1. To roast the garlic:  Preheat the oven to 350 degrees. Peel away the outer layers of the garlic bulb skin, leaving the skins of the individual cloves intact. Slice off about 1/4-inch of the wide, bulbous part of the garlic, leaving the bulbs exposed.

2. Place the head of garlic on top of a piece of aluminum foil and drizzle the garlic with the olive oil.  Season with salt and pepper.

3. Wrap the garlic tightly with the aluminum foil and roast (you can either put the wrapped garlic directly on an oven rack or place it on a baking sheet), and roast until the garlic is softened, about 45 minutes to an hour. ***I was roasting some beets at the same time for a salad, so it was the temperature/time frame I was needing for the beets.  If you have another preferred way of roasting garlic, then use your own method.  Let the garlic cool before handling.

4. Increase the oven temperature to 400 degrees.

5. Once the garlic is cool enough to handle, combine the butter, roasted garlic, garlic powder, and salt in a medium bowl (adjust the garlic and salt according to your own preferences here), mashing the garlic up as you go.  Don’t worry if you still have some small bits of garlic (I actually prefer it that way.)

6. Spread the garlic butter over each piece of bread.  Sprinkle the cheeses evenly over each piece of bread and bake until the cheese is melted and lightly golden, about 8-10 minutes (watch carefully).  Top the bread with fresh parsley, if using.  Enjoy.


Source:  A Curvy Carrot original.

April 8, 2014 - 3:44 pm

Maria Tadic - This looks SO good. Sooooo good! I just made garlic bread this past weekend and just sprinkled some parm on top. It was good…but ALL THIS CHEESE looks way better. Definitely doing this version next time!

April 8, 2014 - 4:10 pm

Katrina @ WVS - I need my garlic bread to be super cheesy and super garlicky too. It’s the only way!! This recipe is fab 🙂

April 8, 2014 - 10:20 pm

Carol at Wild Goose Tea - What is wrong with me? I never even thought of putting cheese on my garlic bread. Duh! What a spectacular idea. I am with you—-bring on the extra garlic and the extra cheese. Great!

April 8, 2014 - 11:27 pm

Joanne - A meal of cheesy bread sounds like a perfect meal to me! I mean…it’s basically pizza without the sauce. And pizza is a legit meal!

April 16, 2014 - 11:25 am

Alison's Wonderland Recipes - These look delicious! I with thinking of making cracked china deviled eggs for Easter, but I might make one of these instead. 🙂

Cheesy Polenta with Caramelized Onion, Mushroom, Kale, and Egg

Cheesy Polenta 3 The Curvy Carrot


There’s this amazing brunch place in Milwaukee that is thankfully within walking distance from my apartment.  So I’ve taken everyone and their brother (literally) to this place on Sunday mornings when they are in town for a weekend visit. Before I started sampling their sweet breakfast dishes (ummm, yes, I’ll take some fresh beignets with kahlua chocolate sauce), I fell in love with this great, savory dish on their menu.   I got it very single time I went (which was a lot).  It was polenta with mixed sautéed vegetables, creamy hollandaise sauce, and a poached egg on top.   They stopped serving it about a year ago which is the reason why I ventured over to the sweet side, but I still miss it.

Let’s be honest here:  I put poached eggs on pretty much anything (like this or this or this).  I’m not going to lie.  They are quick, relatively simple to make and filling. I also have this strange theory that if I eat eggs in the evening, I sleep better. (Yes, I know; it’s weird.)

And since I don’t usually have the time to make a nice hollandaise sauce from scratch every weekend (for a great recipe, click here), I thought I would come up with my own twist on this heavily inspired dish.  I’ve made it a few times, sometimes using instant polenta or trying different combinations of vegetables.  Use whatever you have on hand.  Of course, to cut down on the calories, you can make the polenta sans cheese (but, why? oh why?).  And if you like an especially creamy polenta, add in some butter or milk to make it the consistency you desire. You don’t have to eat this as breakfast either-I think it makes a great weeknight meal.


Cheesy Polenta 2 The Curvy Carrot


Cheesy Polenta with Caramelized Onion, Mushroom, Kale and Egg

Servings: about 4


Ingredients

For the polenta:

4 and 1/2 cups water

1/2 tablespoon salt

1 and 1/4 cups coarse grind cornmeal (I used Bob’s Red Mill brand)

1-2 ounces of Gruyere, grated (or whatever kind of cheese you like)

For the vegetables:

1 tablespoon extra-virgin olive oil

1 medium yellow onion, sliced

Pinch salt

8 ounces mushrooms (I used baby bella, sliced)

1 clove garlic, minced

1 head kale (whatever variety you like), stems removed and coarsely torn

4 eggs, poached

Parmesan-Reggiano cheese, grated (optional)


Cheesy Polenta 1 The Curvy Carrot


Instructions

1. For the polenta:  In a large saucepan, bring the water to a boil over high heat.  Meanwhile, start caramelizing your onions (see below).

2.  Add in the salt.

3. Slowly whisk in the polenta until smooth.  Reduce the heat to low and cook until the polenta is thickened and creamy, about 15 minutes.

4. Remove the pan from the heat and add in the Gruyere cheese, stirring until completely melted.  Set aside (but keep the polenta warm.)

5. For the vegetables:  In a sauté pan over medium heat, heat the olive oil until shimmering.

6. Add the onion slices and a pinch of salt.  Cook, stirring the onions frequently, until they are golden and caramelized, about 10-15 minutes.

7. Add in the mushrooms, stirring frequently, until the mushrooms have let off some of their moisture and have softened, about 5 minutes.

8. Add in the garlic and cook until fragrant, about 30 seconds.

9. In batches, add the kale and stir until it wilts.

10. Divide the polenta between your servings bowls and sprinkle with the Parmesan Reggiano (if using).  Top the polenta with the mushroom mixture.  Place a poached egg (or two) on top, and season to taste with salt and pepper.  Enjoy.


Source:  A Curvy Carrot original.

April 3, 2014 - 7:18 am

Kelli @ The Corner Kitchen - This is my kind of comfort food through and through! I love every single thing about this meal. I used to make something similar when I was at a loss for dinner ideas….definitely have to through this into the rotation more often.

April 3, 2014 - 11:42 am

John Ptacek - Hi. I live in Milwaukee. Where is this groovy restaurant?

April 3, 2014 - 11:43 am

srlacy - Hi John-

It’s Cafe Benelux, in the Third Ward.

April 3, 2014 - 1:39 pm

Coleen @ The Redhead Baker - This looks delicious — a welcome alternative to the monotonous lineup of oatmeal, cold cereal and bagels.

April 3, 2014 - 3:12 pm

Eileen - I just wish I could have a big plate of this for lunch right now! That beautiful runny egg yolk with creamy polenta sounds fabulous.

April 3, 2014 - 10:21 pm

Joanne - Cheese, veggies, and eggs over polenta is one of my favorite go to meals! There’s just nothing you can do to make it taste bad. It’s the best!

April 7, 2014 - 10:10 am

Meagan - Mmmmmm… Cafe Benelux is delicious!

April 28, 2014 - 7:46 pm

Annie - This looks so incredibly good. Can’t wait to try it! I’ve been on a major mushroom kick lately and I always love a runny egg on top 🙂