Roasted Strawberry and Ricotta Bruschetta


IMG_8265


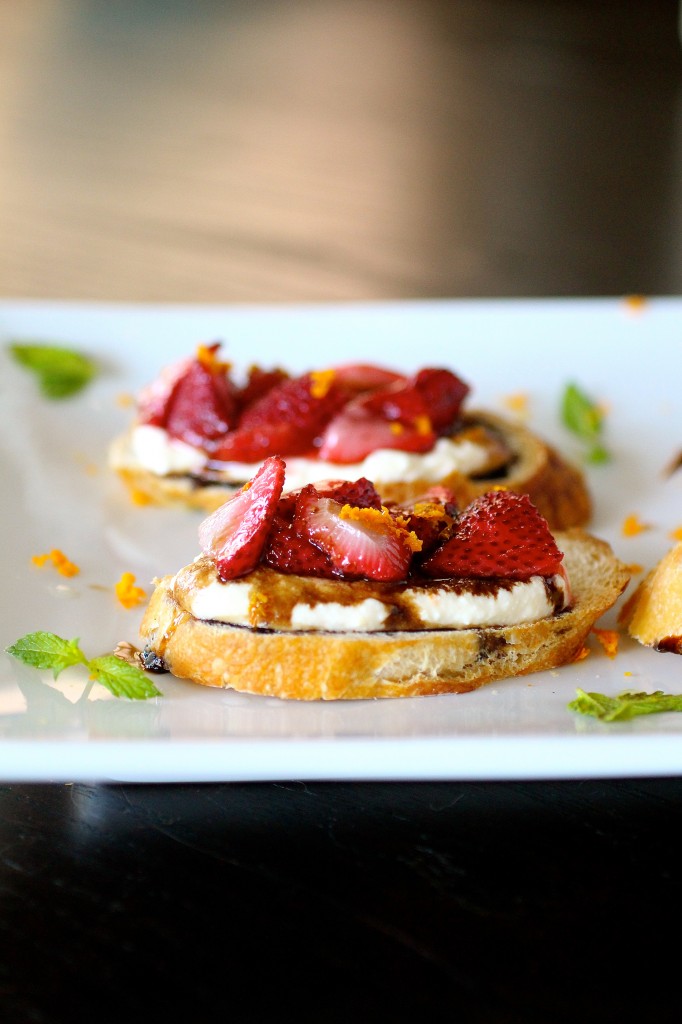
Here’s a little slice of heaven.  Or several slices of heaven.

I bought some strawberries.  You know, the kind of strawberries that you can smell them before you see them-because they are so ripe and juicy and just beautiful.  I wasn’t sure what to do with them, but in a moment of desperation because all of the chocolate in my apartment was gone (how’d that happen?), I decided to just go on the fly and come up with something on my own.

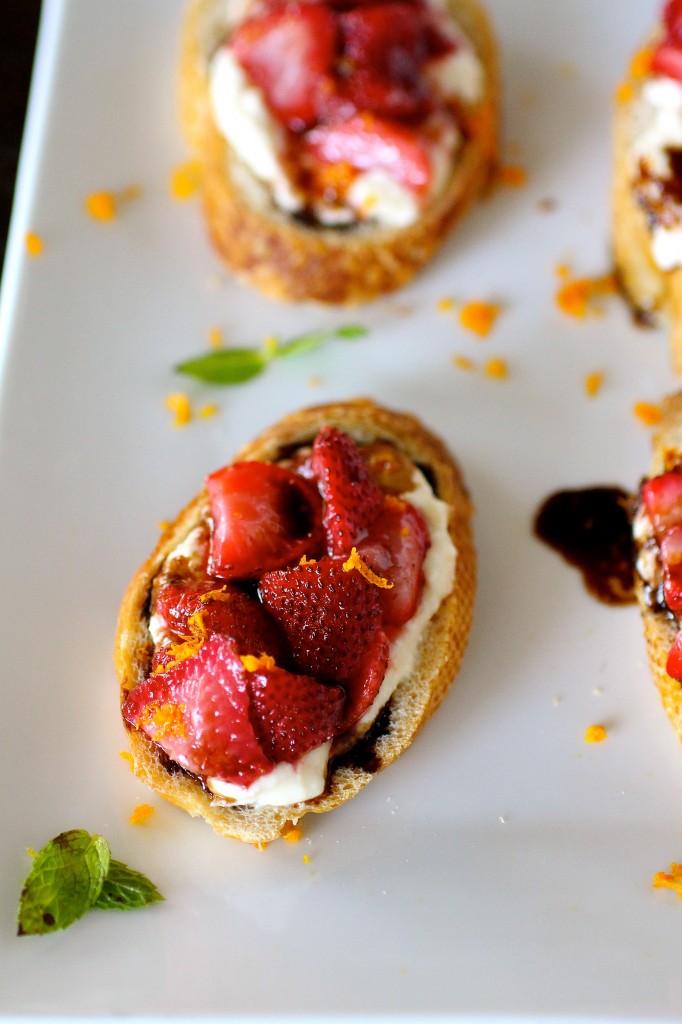
Enter the roasted strawberry.  Not a new concept (here’s a great salad that uses them), but roasted strawberries are simply amazing.  The flavor changes into something out of this world, in my opinion.  And roasting them is super easy to do.  I had some leftover ricotta from another recipe I had made, but usually ricotta is one of those things that just sits in the fridge and goes bad.  So I decided to mix together some ricotta, honey, vanilla, and orange zest-just to see what happened.  What happened was me, standing in my kitchen, eating slice after slice of these little guys, perfectly content if the world ended in the next second..because this might be the best thing I’ve had in a while.  I reduced some balsamic vinegar to drizzle on top just for a little something extra.  In the end, I lost the toasted baguette and just ate the strawberries and ricotta out of the bowl while reading, so it truly was my version of heaven.

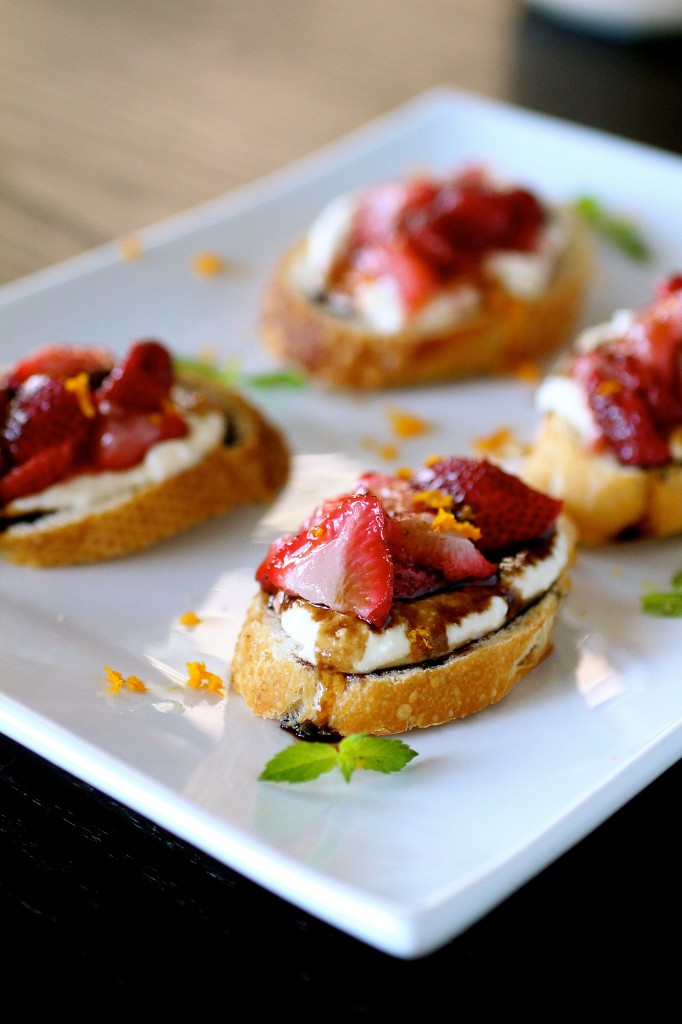
You can serve these up as a nice finger food for a summer party, but, honestly, these are great as a dessert.  My next addition to this recipe?  Getting my hands on some chocolate balsamic vinegar.

Thanks for visiting my happy place.

IMG_8202


Roasted Strawberry and Ricotta Bruschetta

Servings: about 10 bruschetta


Ingredients

1 pound strawberries, cleaned, hulled, and halved lengthwise

1 tablespoon extra-virgin olive oil

1 teaspoon sugar

1/4 teaspoon flaky sea salt

1 cup ricotta (I used part-skim)

2 tablespoons honey

1 teaspoon vanilla

1/2 teaspoon orange zest (or more, depending on your own tastes), plus more for garnish

1/4 cup balsamic vinegar

1 baguette (I used a demi-baguette, so I wouldn’t have leftovers), sliced into 1/4-inch thick slices and toasted

IMG_8177


Instructions

1. For the strawberries: Preheat the oven to 400 degrees.

2. Line the strawberries in a single layer on a rimmed baking sheet lined with parchment paper.

3. Lightly drizzle the olive oil over the strawberries, gently tossing to thoroughly coat.

4. Sprinkle the sugar and salt evenly over the strawberries.

5. Roast the strawberries for about 10 minutes.  Remove from the oven and let cool.

6. For the ricotta mixture: In a medium bowl, combine the ricotta, honey, vanilla, and orange zest, mixing until combined.

7. For the balsamic reduction:  Place the balsamic vinegar in a small saucepan over medium heat.  Bring the vinegar to a boil, letting boil for about a minute or so.  Reduce the heat to low and simmer the vinegar until thickened and syrupy, about 3- 5 minutes or so (watch it closely-the cooking time will depend on the quality of the vinegar you use).  Remove from the heat and let sit until you are ready to use it.

8. To assemble:  Spread 1-2 teaspoons of the ricotta mixture over each crostini, top with strawberries, and drizzle with the balsamic vinegar. Garnish with orange zest, if using.  Serve immediately.


Source:  A Curvy Carrot original.

July 15, 2013 - 12:17 pm

Katrina @ Warm Vanilla Sugar - Roasted strawberries are so lovely, and this sounds awesome! What a fabulous way to use and enjoy summer berries!

July 15, 2013 - 3:53 pm

Mr. & Mrs. P - Lovely little bites!! Who wouldnt love this????

July 16, 2013 - 1:16 am

Therapy for the Conceal-a-holic | ...of pirouettes and concealers - […] hors d’oevres.. why don’t I cook more […]

July 17, 2013 - 9:32 am

Sweetphi - Wow, these look amazing! They seem perfect for strawberry season, can’t wait to try them!

Southwestern “Falafel” with Poached Egg

IMG_7683


This is going to be short post.

I’m typing this almost completely one-handed.  Why?  Because I effectively nearly chopped the top of my right middle finger off today.  The lame part?  I was at work, slicing the avocado I had packed for lunch.  Nothing cool, really.  No war story. Just an apparently super sharp new paring knife, a soft avocado, and a lack of hand-eye coordination on my part.

Thankfully my co-worker had a large bandage…which then needed to be changed…and changed again.

It’s not fun to type, look under a microscope, cut a tomato for part of your dinner, unload a dishwasher, or even wash your face one-handed.  This thing hurts like a beast right now. (Could be worse, I know.)

I feel bad for my right hand.  Being left-hand dominant to begin with, I feel that my right hand has always gotten the worse end of any deal.  Just a few months ago, during an apparently over-zealous swift move with a pizza cutter, I damaged my right ring finger to the point where I have some pretty substantial nerve damage.  My finger nails on my left hand always grow faster  (check it out-they usually do grow faster on your dominant hand), although I will admit that the finger nail polish on the right hand always looks better than the left.  I usually only wear bracelets on the left while the right wrist gets a lonely black hair tie.

Regardless, I need to learn how to handle my cutlery a little better.

Ok.  So this recipe is a definite winner.  The original recipe, from Cooking Light, calls it a “falafel”, which I thought was kind of fun and a little bit deviant from the norm, so I am running with it, too.  I decided to forgo the pita sandwich part, and instead I poached the last lonely egg in the fridge to serve on top. (We all know I like to throw poached eggs on everything, right?  I mean, hey, it’s an ugly little brown patty, and it  will look and taste a million times better with an egg on top.  And poaching just happens to be one of the healthiest ways to cook an egg.  And runny egg yolk in a picture makes me happy.)

For lunch, I took the leftover falafels and ate them warm with smashed avocado on top (hence the finger injury today).  Now, you can add in more veggies to the falafel if you like-I wanted to throw in some corn and red bell pepper, but I didn’t hand any on hand.  I substantially increased the amount of tortilla chips to this recipe because as I was making the falafel, it wasn’t sticking well (which may be because I didn’t fully dry the green onions and kind of threw the rinsed and drained beans in the food processor while they were still soaking…oopps), so if this is a big deal to you, make sure to get rid of a lot of the excess moisture.  Start with 1/4 cup of crushed tortilla chips and work your way up.

IMG_7624


Southwestern “Falafel” with Poached Egg

Servings: 4 falafel


Ingredients

For the falafel:

One 15-ounce can pinto beans, rinsed and drained

1/2 cup queso fresco, crumbled

1/4 cup finely crushed baked tortilla chips (I used this brand, which is freaking awesome) ***please read header.  I ended up using about 3/4 cup to 1 cup of chips because my other ingredients were not dried well and had excess moisture.  Please adjust accordingly.

2 tablespoons finely chopped green onions

1 tablespoon finely chopped cilantro

1/4 teaspoon ground cumin

1 large egg white

1 and 1/2 teaspoons extra-virgin olive oil

For serving:

4 eggs, poached

2 avocados, sliced or smashed (however you like it)

Spinach, tomatoes, black olives, etc.

Salt and pepper, to taste

IMG_7646


Instructions

1. For the falafel: In the bowl of your food processor, combine the pinto beans, cheese, tortilla chips, green onions, cilantro, cumin, and egg white, mixing until smooth, scraping down the sides of the bowl and adding more chips if necessary.

2. Form the mixture into 4 (1/2-inch-thick) oval patties.

3. Heat the olive oil in a large nonstick skillet over medium-high heat.

4. Add the patties; cook 3 minutes on each side or until patties are browned and thoroughly heated.

5. Meanwhile, poach your eggs (if using) and smash your avocado.

6. To serve:  place each falafel over a bed of greens and other veggies (if you like), top with a generous helping of avocado and a poached egg.  Enjoy.


Source: Cooking Light.  This is part of my contribution this month to the Cooking Light Bloggers’ Connection.

July 10, 2013 - 7:56 am

Katrina @ Warm Vanilla Sugar - I think you did rather well for typing one handed! Hope it heals soon! Also, love this recipe!!

July 10, 2013 - 9:53 am

Rachel - I hope you feel better soon! It seems like once you hurt yourself you hit that spot and need that part of your body more than you ever realized. I hope it heals up fast for you! And the recipe looks great!!

July 10, 2013 - 9:59 am

Ashley Bee (Quarter Life Crisis Cuisine) - I never thought of falafel in a breakfast-type situation, but that poached egg has me thinking this would be an amazing brunch dish. Sorry about your finger! I’d do many things for a nice, fresh, ripe, avocado, but chopping fingers is probably not one of them 😉

July 10, 2013 - 10:11 am

srlacy - I completely agree with you!

July 10, 2013 - 12:50 pm

Mr. & Mrs. P - Beautiful!!! Love that you put the poached egg on top!!! Lovely dish!

July 10, 2013 - 8:31 pm

Hannah @ CleanEatingVeggieGirl - I LOVE your Southwestern take on falafel. I am a HUGE falafel fan :). And topping it off with a runny egg? EVEN BETTER!

July 10, 2013 - 9:23 pm

Maria Tadic - I hate when I cut myself! Hurts so badly! I try to keep some ice on it and that usually helps the heart beat in my finger!!! And if you can, try to keep it uncovered while you sleep, b/c the oxygen helps get a nice scab formed more quickly. Hope it heals fast!

July 10, 2013 - 10:25 pm

srlacy - Thanks, Maria-

I will keep it uncovered tonight-it’s amazing at how fast it’s healing…and how much better it feels already!

July 11, 2013 - 6:17 pm

Miss Messy - Sorry to hear about your finger! Ouch! I did it with hard cheese and blunt knife the other day. It did not stop bleeding. My story was a wrestled a tiger away from a baby (the usual). This looks like amazing food,and i just love love love that you put an egg on top!

July 11, 2013 - 6:21 pm

srlacy - Hahaha! I love it! I am totally going to use the tiger line next time!

July 11, 2013 - 10:36 pm

Anna - This will sound crazy, but you’re lucky it was your non dominant hand. I always get injured on my dominant hand.. which is right. Maybe it’s just right hands that get damaged them most.

The recipe sounds amazing, I’m always on the lookout for a good poached egg recipe.

July 11, 2013 - 11:04 pm

srlacy - I can’t imagine how horrible if would have been if it was my dominant hand-yikes. But it’s actually so much better now…here’s to not hurting our hands 🙂

July 12, 2013 - 2:08 am

Ashley @ Wishes and Dishes - This looks so good!! I’m so sorry to hear about your fingers…I sliced my thumb pretty bad on the 4th of July dicing an onion. I feel your pain! Hope you heal up fast… 🙂

July 12, 2013 - 4:14 pm

Taylorbunch - So happy to see this recipe get some love! It has been a well-loved staple in our house for years! My husband would love the poached egg approach as he isn’t much for pitas. I use red onion instead of green. To counteract the wetness of the falafel I just smash up the beans with a potato masher & stick the falafel mix in the fridge for a bit before cooking. The guacamole topping with the original is pretty good when eaten with the pitas. Hope your hand heals soon! Thanks for the wonderful, healthy recipes!

July 12, 2013 - 4:21 pm

srlacy - Oooh, thanks for the tip about chilling the falafel–didn’t think of that!

September 9, 2013 - 8:22 am

Eggs and Beans: Better Together - […] Southwestern “Falafel” with Fried Eggs […]

January 12, 2015 - 1:33 pm

» Savory Falafel Waffles - […] Closet Cooking Falafel Bean Patties, Eat Live Run Southwestern Falafel with Poached Eggs, The Curvy Carrot Vegan Falafel, The Perfect Pantry Herb and Pistachio Falafel, Eats Well with […]

Whole Wheat Blueberry Cinnamon Rolls (a Rosebud Remix)

IMG_7389


Consider this the remix of an old, classic song.

Or, just as my way to get rid of all the half-used bags of whole wheat pastry flour in my pantry.  I mean, seriously.  My inventory-taking skills when it comes to my baking products/canned goods/non-perishable food supply is somewhat lacking.  You would think that I would check to see if I have these things before I head to the store where inevitably (and certainly, if a commonly-used product is on sale), I will end up with yet another bag of something that I might eventually bake with, forgetting that I already have, like, three other of the same types of bags in the pantry already, all opened and half-gone.  This was how it was with the whole wheat pastry flour.  (The tiny bags of powdered sugar are the worst, though.  Right now I have at least four of them in there, waiting to be used. *shamefully hanging my head*)

All right.  On to the Rosebud Remix.  You know how close I am with my family.  And you might know how amazing my two late grandmothers were in the kitchen and how blessed our family is with the gifts they left us of their homemade recipes.  If I ate meat, I could cook you (from scratch) homemade chicken and dumplings, biscuits and gravy, and a mean pot roast with my eyes closed.  When I ate meat, I ate these things consistently, being a “wholesome Midwestern girl.” (Ha.)

In a way, though,  I miss those things.  I’ve come up with a decent vegetarian biscuits and gravy since (although, I have to admit I now have a better version that my future brother-in-law asks for whenever I am in town…maybe when I’m feeling a little in need of major comfort food, I’ll share it here with you.)

But Rosebud, the mother of my mother, was the bread-maker.  I’ve got her sticky buns, her white bread (one of the best things about life, I think), and her wheat bread.  And her original cinnamon rolls (which was one of my earliest posts.)

But the other morning, realizing that I had a surplus of blueberries and whole wheat pastry flour and a mean craving for a cinnamon roll (so that I could sit, legs propped on my coffee table, with a coffee and the second book of the Game of Thrones series for maybe six hours), I decided to adapt her recipe for a somewhat lighter and healthier version.  Now, there’s still sugar and butter and a creamy sweet glaze, but I still wanted my cinnamon roll to taste like a cinnamon roll…or else, what’s the point?  I wasn’t sure if it would work, but it did.

So here it is…a Rosebud Remix.

IMG_7366


Whole Wheat Blueberry Cinnamon Rolls (a Rosebud Remix)

Servings: 18-24, depending on how big you make your rolls


Ingredients

For the rolls:

4 and 1/2 teaspoons active dry yeast

3/4 cup warm water, plus an additional 1 cup of room temperature water

1 and 2/3 cup skim milk

1/2 cup sugar

1 tablespoon salt

3 tablespoons unsalted butter, softened

9-10 cups whole wheat pastry flour

1/4 cup butter (4 tablespoons), melted

1 egg

For the filling:

1 cup sugar

2 teaspoons cinnamon

2 cups fresh blueberries

For the glaze:

2 cups powdered sugar

1 teaspoon vanilla extract

2 tablespoons skim milk

1 pinch of salt

IMG_7432


Instructions

1. For the rolls: Add the yeast to  3/4 cup warm water, set aside and let sit for about 5 minutes, or until foaming.

2. While the yeast is dissolving, mix the additional 1 cup of water, milk, sugar, salt, and 3 tablespoons softened butter in a mixer fitted with the dough hook until smooth.

3. Add the dissolved yeast solution to the mixer, mixing on low speed until combined.

4. Add 5 cups of pastry flour, mixing until smooth.

5. Mix in the remaining flour (I used only 9 cups total) and knead (with the mixer) using the dough hook on low speed for 10 minutes.  You want the dough to form a nice ball that pulls away from the sides of the mixer.  Add more flour if you need it.

6. Remove the dough from mixer bowl and place in greased bowl; cover with a towel.

7. Let the dough rise for about 1 and 1/2 hours in a warm place, covered, or until doubled in size.

8.  After the dough has doubled in size, punch it down to remove excess air and roll out in a long rectangle: approximately 12×36″.

9. Brush the rectangle with the melted butter.

10. For the filling: In a medium bowl, whisk together the sugar and cinnamon.

11. Sprinkle the cinnamon-sugar evenly over the dough.  Lightly press the fresh blueberries into the dough in an even layer.

12.  Roll up the dough tightly to form a cylinder shape and cut  in 1 and 1/2-inch slices.

13. Spray a large pan (I used a roasting pan) with cooking spray.

14. Place the slices into a large pan and cover; let rise until double (about another hour).

15. Pre-heat oven to 375 degrees.

16.  In a small bowl, whisk the egg and brush lightly over the surface of the rolls.

17.  Bake the rolls for approximately 25 minutes or until the tops of the are golden.  Let cool slightly before glazing.

18.  For the glaze: In a small bowl, whisk together the powdered sugar, vanilla, milk, and salt until smooth.

19. Drizzle the glaze over the tops of the cinnamon rolls.


Source:  A Curvy Carrot original.

July 8, 2013 - 7:29 am

Kathleen - These look yummy, but where do I put the blueberries? In with the cinnamon and sugar?

July 8, 2013 - 7:52 am

Katrina @ Warm Vanilla Sugar - I always have too much flour too…of like EVERY kind! These sound fabulous. Blueberries are everywhere right now, so this is perfect timing too!

July 8, 2013 - 8:39 am

srlacy - Hey Kathleen-
Yes! Thanks for catching that-you are right! This is what happens when I decide to drink a glass of wine when writing these posts 😉 ! It’s all fixed now.

July 8, 2013 - 12:24 pm

Ashley @ Wishes and Dishes - Cinnamon rolls are my weakness! Love this recipe!

July 8, 2013 - 2:13 pm

Mr. & Mrs. P - Gorgeous cinnamon rolls. Perfect with a tall cup of coffee!

July 11, 2013 - 11:48 am

Jessie - Can you freeze these? If so when? They sound amazing!

July 11, 2013 - 11:53 am

srlacy - Hi Jessie-

Absolutely! And I did. Now, I went ahead and baked them in a big batch and just froze a few already baked (without the glaze-I’ll just make that fresh next time.) I haven’t tried freezing the dough before baking, but I would think it could be done. I would let it go through the entire rising process and cut them into rolls first before you freeze them, if you want to try it that way. Then bake them once they thaw out.